ROSEMARY HARRIS: I'm about to embark on my first self-published ebook adventure. So many people have done it - why not me?
Weeeeeelllll - because I'm terrified? Because I'm afraid I'll mess up the formatting and earn a slew of one star reviews because the indentations are too big? Too small? Non-existent? Because I'll click Yes on something that somehow prevents me from doing something else - or worse - mangles the book?
So to give myself a little confidence, I asked one of my more experienced buddies to share his knowledge of self-publishing with me and the JR gang.
VINCENT H. O'NEIL: I’ve prepared numerous books for print-on-demand and e-book
production, and there are many ways to go about this. There is also a wide
range of publishing sites and services, each with its own advantages and
disadvantages, but the most common questions I hear involve formatting. It’s
not as challenging as it might sound, and so here is an approach I’ve found
useful.
NOTE: Some of the detailed instructions here involve MS
Word, but the concepts discussed should translate to other software. My
experience with e-readers is largely confined to Kindle and Nook, but hopefully
most of this guidance will apply to other versions. The conversion software is
steadily improving, and so some of these considerations may soon become
outdated.
The basic idea is to create a single book file which will be copied as two
separate files that are then adjusted, one for print-on-demand and one for e-book.
Here we go:
Unless
the book is going to be very long, use 12 pt font or higher.
- Single
space the entire book.
- Make
sure you include a copyright notice, an Author Biography, your website, and
a list of all your other books in a “Books by this Author” segment.
- Avoid
underlining (for example, “Chapter One”) because in an e-reader
conversion the blank lines following that underlining sometimes appear
with what looks like a dash because the underlining continued past the
underlined words. Bold face seems to have no negative consequences.
- Consider
putting a marking symbol (such as a black dot) in the center of the blank
line between segments within a chapter; this helps people reading the book
on an e-reader to know a segment has ended.
- In Page
Setup / Margins / Pages, select “Mirror Margins”. This will let you see
the pages as they will appear in the printed book, as well as create
proper margins.
- In
Page Setup / Margins, set the inside and outside margins according to the
chart below (Leave the “Gutter” at zero).
Total Pages Inside
Margin Outside
Margin
24-150 at
least .375” at
least .25”
151-400 at least .75” at
least .5”
400-600 at least .875” at least
.5”
>600 at least 1.0” at
least .5”
Don’t get overly concerned about
this; the “Preview” function in most print-on-demand software is pretty good
and you can adjust from there. For a standard-sized book (roughly 220 pages) I
use .7” for top, bottom, and outside margins and .8” for inside.
- I
recommend setting the tab / paragraph indents at .3 to save space. Also
select “Justify” so that the words on each line stretch from margin to
margin.
- Insert
the page numbers, page breaks, and section breaks that you want for the
printed book; many of these will be removed by the e-reader conversion,
but there are fixes for the ones you want to keep.
- Once
the file is complete, save it as a Print On Demand file and an e-book file
because you will be doing different things to each.
For the Print On Demand File:
- Add a
blank page in front so that the book opens on a blank page instead of the
title page.
- Any
time you want to leave the page numbers off (for example, the title page
and the dedication) add a Page Break, a Section Break (continuous), and
another Page Break on the last page before you want the page numbers. Then
select “View Header / Footer” and open the footer for the first page that will
have a page number. Click inside that footer and then unselect “Link to
Previous”. Then move up to the footer above that one (it should show a
different number, as in “Footer Section 1” versus “Footer Section 2”) and
delete the page number manually. The page numbers should remain going
forward.
- I
generally start new chapters on a new page, roughly halfway down.
- Depending
on the service you use, you will be able to preview the final document
digitally after it is loaded. The digital review will reveal any glaring
errors, but it is still important to get a proof copy and review it
thoroughly before putting the finished product on sale.
For the E-Book File:
- When
you load the file onto whatever site you’re using, the conversion software
is likely to remove much of the Print On Demand-specific formatting.
- If you
want to keep a page break, enter a Section Break (continuous) where the
original Page Break was. I generally only do that at the beginning (title
page, dedication, etc.) and let the completed chapter scroll right into
the next one.
- The
Page Numbers will be removed automatically; they’re not needed.
- Different
e-reader platforms (Basic Kindle, Kindle Fire, Nook, etc.) emplace indents
on their own or fail to recognize the indents in some files. Although it’s
a bit of work, here is a fix that has worked for me: I recommend removing
all indentation so that every line (including the indented first line of
each paragraph) is left-justified. Then highlight each segment in turn, go
to Format / Paragraph / Indentation and select Special / First line and
set it to .3. All of your paragraphs will indent to .3, which should keep
the indentation standard across platforms.
- The
Preview function in most e-reader setup software is usually very good, so
once the file is loaded go through the entire book and see if anything looks
wrong. Most problems are fixable by adjusting the file, reloading it, and
checking it again.
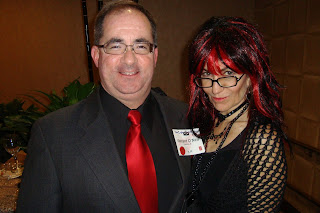
ROSEMARY: Vinny will be checking in today to say hello and answer questions. He'll be back tomorrow to tell us all about his latest novel, Interlands AND you can learn more about the writer Marilyn Stasio of the New York Times called "a polished writer with a breezy style." at his website www.vincenthoneil.com
Wow - high praise indeed. To me, he's just fun lovin' Vinny as you can see in one of my favorite pix. That's the two of us at Crimebake's Vampire Ball.

 Creating a protagonist who is complex and interesting makes
it simple to then weave indications of gender into the story, and this in turn
lets the character behave naturally.
Creating a protagonist who is complex and interesting makes
it simple to then weave indications of gender into the story, and this in turn
lets the character behave naturally.